CS5520-Week5-Threads
Week 5 - Threads, AsyncTask, Broadcast
Android Threads
Main Thread and UI Thread Use Interchangblely
When Launch new Activity, it happens on Main Thread unlsess explicitly done something to have it run on other threads
The Android User Interface (UI) toolkit refers to a set of tools and APIs provided by the Android framework that developers use to design and manage the user interface of their applications. This toolkit includes a wide range of UI elements such as buttons, text views, list views, layout managers, and many more, which are essential for creating interactive and visually appealing applications.
Android Uer Interface toolkit is not thread safe
Rules to follow:
- Never block UI/Main Thread ← 所以也不需要intensive的东西
- Do not access UI from a non-UI Thread
Android Components:
在Android开发中,Activities(活动)、Services(服务)和Broadcast Receivers(广播接收器)是三种主要的应用组件,每种组件都有其特定的用途和生命周期。下面是每种组件的简介和比较,以及相应的例子。
Activities(活动)
- 定义: Activity是一个代表单个屏幕的UI组件,用户可以与之互动。它通常充当应用程序中的一个界面,用于显示信息、接收用户输入等。
- 用例: 例如,一个电子邮件应用可能有一个显示收件箱列表的Activity,点击某个邮件后,会启动另一个Activity来显示邮件内容。
Services(服务)
- 定义: Service是一个用于在后台执行长时间运行操作而不提供用户界面的组件。服务可以在应用程序的背景中执行任务,即使用户没有直接与应用程序交互。
- 用例: 例如,一个音乐播放应用可以使用Service在后台播放音乐,即使用户离开了应用的界面。
Broadcast Receivers(广播接收器)
- 定义: Broadcast Receiver是一种用于接收和响应来自其他应用程序或系统的广播通知的组件。它们主要用于监听和响应系统级事件,如屏幕关闭、电池电量低等。
- 用例: 例如,应用程序可以注册一个Broadcast Receiver来监听设备启动完成的广播,以便在设备启动时执行某些操作。
Process Heirarchy
手机的资源比较紧缺所以会按照层级来移除低等级的Process
- Foreground Process
- most important, required to do right now
- 一般指:
- Running an activity the user is interacting with
- BroadcastReceiver that is currently running
- Service currently executing code in a callback
- Visible Process
- Activity visible on Screen but not active (onPause() has been called)
- Service is running in the foreground ← Music Player playing music
- Service that manages something the user might be aware of ← live wallpaper
- Service Process
- Hosting a service that is started
- Usually not as visible to users
- Doing something the user cares about
- eg updating or downloading something
- Cached Process (Android use LRU strategy)
- not currently active, but could become active soon
If the main thread cannot finish executing blocks of work within 16ms, the user may observe hitching, lagging, or a lack of UI responsiveness to input. If the main thread blocks for approximately five seconds, the system displays the Application Not Responding (ANR) dialog, allowing the user to close the app directly.
Java Runnable - Threads


您上传了三张关于并发编程中的进度图(progress graphs)和关键部分(critical sections)与不安全区域(unsafe regions)的图表。这些图表是并发编程概念的视觉表示,让我们来逐一解读。
第一张图:Trajectories in Progress Graphs
这张图展示了两个线程(Thread 1 和 Thread 2)的可能执行轨迹。轨迹是合法的状态转换序列,描述了线程可能的并发执行。图中的示例轨迹是:
H1, L1, U1, H2, L2, S1, T1, U2, S2, T2
这意味着:
- Thread 1 从 H1 开始,执行到 L1,然后是 U1。
- 然后,Thread 2 从 H2 开始,执行到 L2。
- 接着是 Thread 1 的 S1,T1。
- 然后是 Thread 2 的 U2,S2,T2。
这个轨迹通过红色箭头标出,表明了线程的执行顺序和交替。
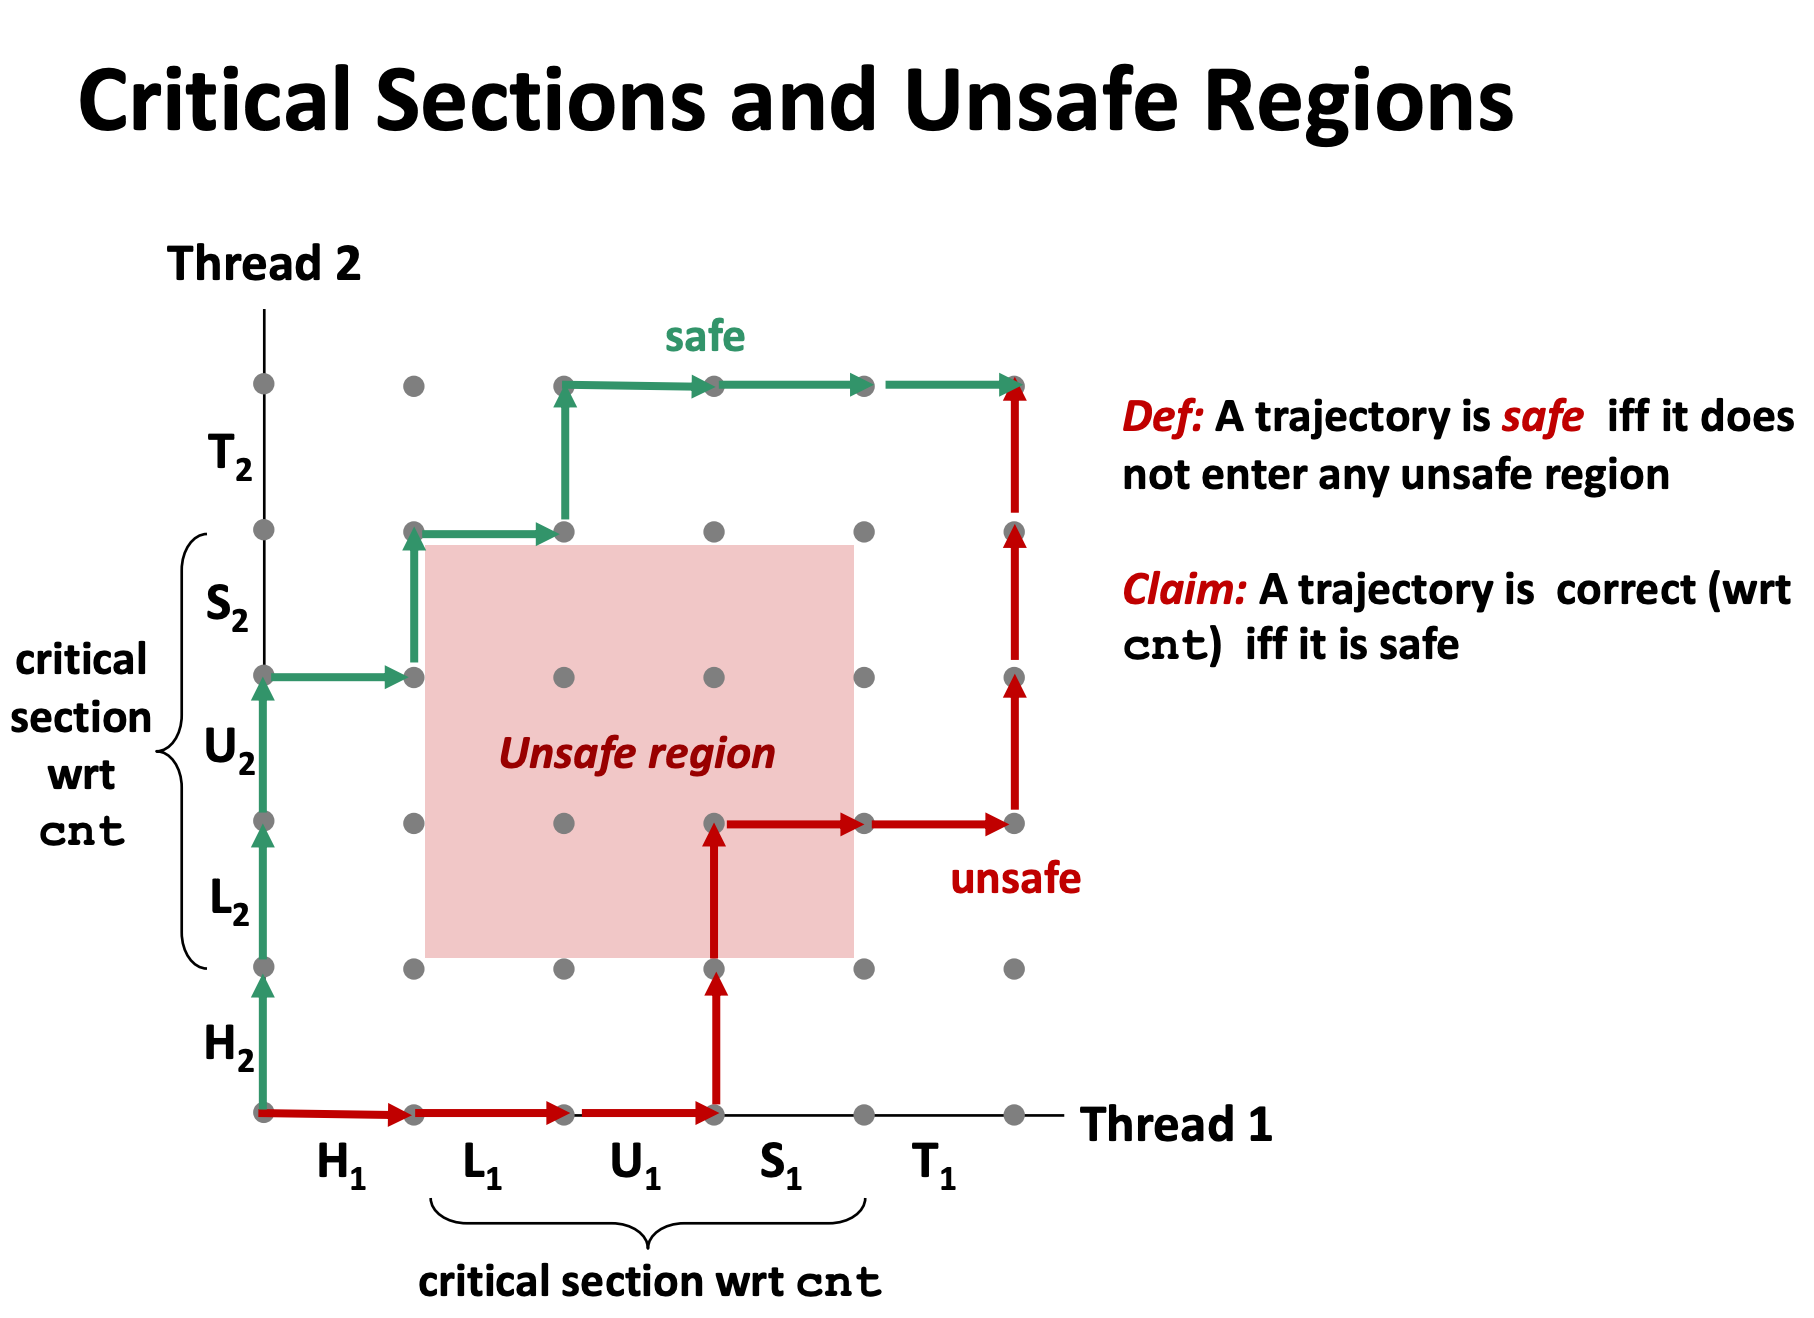
第二张图:Critical Sections and Unsafe Regions
第二张图说明了什么是关键部分和不安全区域。关键部分是指访问共享资源(在这个例子中是 cnt 变量)时的代码区域,应该避免两个线程同时进入此区域。不安全区域是图中标红区域,表示如果两个线程的执行轨迹同时进入这个区域,就可能发生竞态条件(race condition),导致不可预测的结果。
第三张图:Critical Sections and Unsafe Regions with Safe Trajectory
第三张图显示了一个安全的执行轨迹,即在任何时候都避免进入不安全区域。绿色箭头表示了一个安全轨迹的例子,这个轨迹没有进入不安全区域,因此对于共享变量 cnt 来说是正确的。
总结
- 轨迹(Trajectory):线程的执行序列。
- 关键部分(Critical Section):一个或多个线程访问共享资源的代码区域。
- 不安全区域(Unsafe Region):可能导致并发错误的状态集合。
- 安全轨迹(Safe Trajectory):一条不穿越任何不安全区域的轨迹。
这些图是并发编程中同步和互斥概念的可视化表示。它们用于教学和理解如何在多线程环境中安全地协调对共享资源的访问。

您上传的图片显示了一个名为 RaceCondition 的类,它包含一个名为 sharedResource 的共享资源和一个名为 startTwoThreads 的方法。这个方法创建并启动两个线程,t1 和 t2。线程 t1 将 sharedResource 的值增加1(sharedResource++),而线程 t2 将其减少1(sharedResource--)。
以下是根据前面的图表分析的结果:
轨迹(Trajectory)
在这个示例中,轨迹是两个线程对 sharedResource 变量执行的操作序列。例如,如果 t1 先执行,然后是 t2,轨迹可能是 H1, L1, U1, H2, L2, U2。但是,由于操作系统的调度,我们无法保证执行的顺序。如果线程 t1 和 t2 几乎同时运行,它们对 sharedResource 的操作可能会交错,导致多种可能的轨迹。
关键部分(Critical Section)
在这个例子中,关键部分是对 sharedResource 的增加和减少操作。由于这些操作不是原子的(也就是说,它们不是一个不可分割的单个操作),它们可以被另一个线程的操作中断。如果两个线程同时进入关键部分,就可能导致 sharedResource 的最终值不正确。
不安全区域(Unsafe Region)
不安全区域是指如果两个线程的操作交错发生时,可能导致数据不一致的状态集合。在这个代码示例中,不安全区域包括了所有可能导致 sharedResource 更新不正确的状态。例如,如果线程 t1 执行 sharedResource++ 但在完成这个操作之前被线程 t2 打断,线程 t2 执行 sharedResource--,那么最终 sharedResource 的值可能不会反映两个操作。
安全轨迹(Safe Trajectory)
一个安全轨迹是一种线程执行顺序,其中不发生任何进入不安全区域的情况。要实现安全轨迹,需要同步机制来确保当一个线程在执行对 sharedResource 的操作时,另一个线程不能执行其操作。在Java中,可以通过使用 synchronized 关键字或显式的锁(如 ReentrantLock)来保证操作的原子性,从而创建一个安全的轨迹。
为什么
由于Java中的线程调度是不确定的,因此两个线程对 sharedResource 的操作可能会以不可预测的方式交错。这就是为什么这段代码存在竞态条件的风险,以及为什么不使用同步机制时,不能保证 sharedResource 的值是线程安全的。通过使用同步机制,我们可以确保每次只有一个线程能够进入关键部分,从而避免不安全区域并保证数据的一致性。
要解决这种竞态条件,您可以使用 synchronize 关键字来确保对共享资源 sharedResource 的操作是原子性的,这样同一时间只有一个线程能够访问和修改它。
在Java中,有几种方法可以使用 synchronize 关键字来同步对共享资源的访问:
同步方法(Synchronized Method):
您可以将整个方法声明为同步的,这将锁定包含该方法的对象实例,以便一次只有一个线程可以执行该方法。1
2
3
4
5
6
7
8public synchronized void increment() {
sharedResource++;
}
public synchronized void decrement() {
sharedResource--;
}同步块(Synchronized Block):
如果您只想同步方法中的一部分代码(也就是关键部分),您可以使用同步块。1
2
3
4
5
6
7
8
9
10
11
12public void increment() {
synchronized(this) {
sharedResource++;
}
}
public void decrement() {
synchronized(this) {
sharedResource--;
}
}
在这两种情况下,this 引用的是包含 synchronized 代码的对象实例。当一个线程进入一个同步的方法或块时,它会获得该对象的锁,并在退出时释放锁。其他线程必须等待锁被释放才能执行同步的代码。
这是您原始代码的修改版本,使用了同步方法来解决竞态条件:
1 | public class RaceCondition { |
通过同步 increment 和 decrement 方法,我们确保了 sharedResource 的增加和减少操作是线程安全的。
在Java中,wait(), notify(), 和 notifyAll() 是 Object 类的一部分,它们用于线程间的通信,特别是在同步代码块内部。这些方法用来协调需要共享资源的多个线程之间的交互,特别是当某些条件不满足时,线程需要等待其他线程来改变这些条件。
wait()
wait() 方法用于使当前执行的线程暂停执行(进入等待状态)直到其他线程调用同一对象上的 notify() 或 notifyAll() 方法。调用 wait() 之前,线程必须持有该对象的锁,调用 wait() 后,它会释放锁并进入对象的等待池。一旦该线程被 notify() 或 notifyAll() 唤醒,它会尝试重新获取锁,并在成功后继续执行。
notify()
notify() 方法用于唤醒在此对象的等待池中等待的单个线程。如果有多个线程都在等待,那么会选择其中一个线程(选择方式不确定)进行唤醒。被唤醒的线程将尝试重新获得对象的锁,一旦获得,它可以继续执行。
notifyAll()
notifyAll() 方法唤醒在此对象的等待池中等待的所有线程。这不是立即将锁分配给这些线程,而是让它们竞争对象锁。只有锁可用时,这些线程中的一个才能继续执行。notifyAll() 通常用于通知所有等待的线程条件可能已经满足,让它们重新检查条件是否达到了可以继续执行的状态。
使用示例
假设你有一个生产者-消费者问题,其中消费者线程需要等待生产者线程在队列中放入对象。
1 | public class SharedResource { |
在上面的例子中,produce() 和 consume() 方法都是同步的,这意味着它们在执行前要获取 SharedResource 对象的锁。如果条件不满足(例如,队列满或空),生产者或消费者将调用 wait() 并释放锁,进入等待状态。当一个生产者或消费者更改了条件后,它将调用 notifyAll() 来唤醒所有等待的线程,这些线程将尝试重新获取锁,并检查它们的条件是否现在满足了。
重要的是要记住,使用这些方法时需要注意正确的条件循环(通常是 while 循环),以避免虚假唤醒带来的问题。此外,在调用 wait(), notify(), 或 notifyAll() 时,线程必须持有那个对象的锁。

在您提供的代码示例中,使用了读写锁(ReentrantReadWriteLock 或类似的锁实现),这是一个支持多个读取操作和一个写入操作的锁机制。
为什么需要读锁(Read Lock)
- 数据一致性:即使是看似简单的读取操作,也可能会因为同时进行的写入操作而返回不一致的数据。例如,如果一个线程正在读取一个值,同时另一个线程在写入这个值,没有合适的同步可能导致读取操作获得一个无效的值。
- 防止写入时读取:读锁可以确保没有写操作正在进行,这样读取操作就可以安全地进行。在这种锁的机制中,任何时候都可以有多个读取操作进行,只要没有写锁被持有。
作用
- 多读单写:读写锁允许多个线程同时读取,但保证只有一个线程进行写入,从而在保持并发读取的同时,还能保证写入的独占性和数据的完整性。
- 性能优化:相比于传统的互斥锁(如
synchronized关键字或ReentrantLock),读写锁在只进行读取操作时允许更高的并发性,这可以在多线程环境下显著提高性能。 - 避免读取脏数据:使用读锁可以确保在读取期间不会有其他线程进行写入,这意味着读取操作不会得到部分更新的“脏数据”。
在您的代码中,readState() 方法在读取 sharedResource 前获取了读锁,并在返回值后释放了读锁。这确保了在执行读取操作时,不会有其他线程正在执行写入操作(changeState() 方法),从而保持了数据的一致性和完整性。
正确的锁释放
在 finally 块中释放锁是非常重要的,因为它确保了即使在尝试获取或返回共享资源时发生异常,锁也会被释放,这样就不会导致死锁或资源不再可用。
这段代码就体现了一种在多线程环境中保证数据一致性的好做法,它通过适当地使用锁来同步对共享资源的访问。
在Java中,创建线程有两种常见的方法:继承 Thread 类和实现 Runnable 接口。下面是两种方法的说明和示例。
继承 Thread 类
当你继承 Thread 类时,你需要重写其 run 方法来定义线程执行的代码。然后你可以创建该类的实例并调用 start 方法来启动新线程。
1 | class MyThread extends Thread { |
实现 Runnable 接口
实现 Runnable 接口是创建线程的另一种方式。你需要实现 run 方法,然后将 Runnable 实现类的实例传递给 Thread 类的构造器,并启动线程。
1 | class MyRunnable implements Runnable { |
继承 Thread 类 vs 实现 Runnable 接口
虽然这两种方式都可以用来创建线程,但它们之间有一些重要的区别:
- 实现
Runnable接口的优点:- Java不支持多重继承。如果你的类已经继承了另一个类,你就不能再继承
Thread类,但你仍然可以实现Runnable接口。 - 实现
Runnable接口可以使类更加灵活地被多个线程实例共享和执行。
- Java不支持多重继承。如果你的类已经继承了另一个类,你就不能再继承
- 继承
Thread类的缺点:- 继承
Thread类意味着你不能再继承其他类,因为Java不支持多重继承。 - 当你继承
Thread类时,你的线程类不能被其他的子类再次扩展。
- 继承
通常情况下,实现 Runnable 接口被认为是更好的做法,因为它更加灵活,使你的线程代码可以被多个执行器(Executors)或线程共享,而不是限制在单个 Thread 对象中。

differentThread类继承自Thread类。它在其run()方法内部包含一个循环,循环会执行10次。- 在
differentThread的run()方法中,使用了Handler.post()方法。这并不是创建了一个新的线程,而是在Android的UI线程中安排一个Runnable对象执行。这是因为对UI的操作需要在UI线程中执行,而Handler.post()是将一个任务排队到UI线程的事件队列中,这样它就可以在UI线程中被处理。 final int finalI = i;这行代码是创建了一个在内部匿名Runnable类中使用的最终变量(因为局部变量在内部类中使用时必须是最终的或事实上最终的)。- 在每次循环中,都会通过
Handler.post()发布一个新的Runnable到UI线程的消息队列中,这个Runnable设置TextView的文本。这不是创建新线程,而是在UI线程中调度任务。 Thread.sleep(1000);使differentThread睡眠1秒钟,这是在differentThread线程中进行的,不会影响UI线程。
通过循环创建10个thread:
如果您去掉 textHandler.post() 并且是在一个普通的Java环境(而不是Android),直接在循环内部创建并启动线程,那么您将会创建多个线程。以下是一个简单的Java示例,它在一个循环中创建和启动了10个线程:
1 | public class MultipleThreadsExample { |
在这个示例中,每次循环都会创建一个新的 Thread 实例,并将一个新的 Runnable 实例传递给它。然后调用 start() 方法启动线程。每个线程将在控制台输出它正在运行的线程名称。这样,一共会有10个线程被创建并启动,它们将并发执行。
Runnable:
在Java中,Runnable 是一个接口,用于创建可以由线程执行的任务。它是并发编程的核心接口之一,表示一个抽象的可执行任务。
定义
Runnable 接口非常简单,它只有一个方法:
1 | public interface Runnable { |
实现
当一个类实现了 Runnable 接口,它需要提供 run 方法的实现。run 方法定义了线程启动时执行的操作。以下是一个实现 Runnable 接口的简单示例:
1 | public class MyRunnable implements Runnable { |
使用
要执行一个实现了 Runnable 接口的任务,你需要将它传递给一个 Thread 对象然后启动该线程:
1 | MyRunnable myRunnable = new MyRunnable(); |
当调用 thread.start() 时,新的线程会启动并执行 run 方法中定义的代码。
优点
使用 Runnable 接口的主要优点是它更加灵活。由于Java不支持多重继承,如果你已经继承了另一个类,就不能再继承 Thread 类。但你仍然可以实现 Runnable 接口来定义线程行为。这使得 Runnable 成为创建和管理线程的首选方式,尤其是当需要执行多个相同任务的时候,可以重用同一个 Runnable 实例来创建多个 Thread 实例。
与 Callable 的比较
Runnable 接口与 Callable 接口相似,但有一个主要区别:Runnable 的 run 方法不返回值也不抛出异常,而 Callable 的 call 方法可以返回值并且可以抛出异常。因此,Callable 通常与 Future 结合使用,可以获取异步计算的结果。
Runnable 通常用于那些不需要返回结果的场景,例如,只是简单地运行一些后台任务,比如日志记录、监控文件系统变化等。
Threading in Android
Threads are three types in Android:
UI Thread
- Main thread: Excuting Android components and updating UI elements
Binder Thread
- Commnuciate between threads in different processes
- each process has a thread pool for incoming requests
Background Thread
- App-created threads - Worker thread
- Descendants of UI thread
In Android, both processes and threads are fundamental units of execution, but they serve different roles:
Process in Android:
- Each Android app runs in its own process, which is an instance of a Linux process.
- Processes are isolated by the Android runtime, meaning that one process cannot normally access the memory of another process.
- Each process has its own virtual machine (VM), so code from one app cannot directly affect the code of another app.
- Processes are a heavy-weight unit of execution in terms of system resources.
Thread in Android:
Inside each Android app process, multiple threads can be created.
Threads are lighter-weight units of execution that share the same memory space within the process.
Threads within the same process can communicate with each other more easily than between processes.
All threads of an application are in the same Linux process, but each thread can perform different tasks in parallel.
threads from one app do indeed compete with all other threads on the device for CPU resources. Here’s how it works:
- CPU Scheduling:
The operating system’s scheduler manages all threads on the device, regardless of their originating process. The scheduler decides which threads to run, when to run them, and for how long, based on various factors such as thread priorities, CPU affinity, and other scheduling policies. - Thread Priorities:
Each thread has a priority that influences its scheduling. The Linux kernel uses these priorities to decide which threads should be allocated CPU time. In Android, the main thread, or UI thread, of an app typically has a higher priority because it must remain responsive to user input. - Concurrency:
Modern devices typically have multiple CPU cores, allowing true parallel execution of threads. However, when the number of active threads exceeds the number of available CPU cores, the scheduler has to allocate time slices for each thread to share the CPU resources, which is where the competition comes into play. - Resource Sharing:
Even though threads within an app share the same memory space and resources of their parent process, they still need to use shared system resources such as the CPU and memory. This sharing necessitates competition among all threads on the device. - Fairness and Responsiveness:
The scheduler in the operating system aims to balance fairness (giving each thread a chance to run) with responsiveness (ensuring that high-priority threads, like those handling user interface interactions, are given preference). Android’s scheduler also includes considerations to minimize the impact of background applications on the foreground application’s performance. - Background vs. Foreground:
Android tries to give more CPU time to the foreground app to ensure a smooth user experience. Background apps have their threads scheduled with lower priority compared to the threads of the foreground app.
In conclusion, while threads are conceptually within the scope of their own app’s process, they are indeed competing with threads from other apps and system processes for CPU time. The operating system’s scheduler is responsible for managing this competition in a way that aims to be fair and maintain a responsive system.
- CPU Scheduling:
Competition and Scheduling:
- Threads do not compete across different processes for execution time. Instead, the Linux kernel scheduler decides which process gets time on the CPU. Within each process, the threads are scheduled for execution time based on thread priority and other factors.
- When a thread is created in Android, it competes for CPU time with all other threads within the same priority level across all processes on the device. The scheduler, based on various criteria, decides which thread runs next.
- The main UI thread (also known as the main thread) is the default thread that handles all UI operations and is created when an Android app starts. It must remain responsive to avoid Application Not Responding (ANR) errors.
Android’s Thread Management:
- Android does enforce some rules and best practices to manage threads efficiently:
- CPU-intensive or blocking operations should not be performed on the main UI thread but rather on background threads.
- The
AsyncTaskclass,HandlerThread, and other concurrency constructs such asjava.util.concurrentpackage classes can be used to perform tasks on background threads and communicate back to the main thread for UI updates. - Starting from Android 5.0 (API level 21), the
JobSchedulerclass allows you to schedule tasks or work across multiple threads with conditions (like network availability).
In summary, while each Android app runs in its own process, it can create multiple threads. These threads do compete for CPU resources with threads from other apps, but the competition is managed by the operating system’s scheduler. The main thread in each app is special and should be kept free from blocking operations to maintain a responsive user interface.
AsynchTask


Broadcast Receivers
allows to be notified when an event occurs
- complete tasks in less than 10 seconds
- often use with initializing a service

Alarm Manager to allow the broadcastreceiver to run in the future - use case: update new headlines
In Android, IntentFilter and BroadcastReceiver are components used in the context of inter-process communication. They work together to allow an application to receive intents that are broadcast by the system or other applications.
BroadcastReceiver
A BroadcastReceiver is an Android component that responds to broadcast messages from other applications or from the system itself. These messages are wrapped in Intent objects. Broadcasts can be used to deliver many kinds of events to applications that aren’t necessarily running at the time of the broadcast. For example, an application can register to receive system events, like when the Android device boots up, when the battery is low, or when the user has taken a picture.
Here’s a simple example of a BroadcastReceiver:
1 | public class MyBroadcastReceiver extends BroadcastReceiver { |
IntentFilter
An IntentFilter specifies the types of intents that a BroadcastReceiver can respond to. It declares the capabilities of a BroadcastReceiver, filtering out intents that are of not interest to the receiver. An IntentFilter can be declared in code or in the AndroidManifest.xml file.
For example, an IntentFilter can be set up to listen for a boot completion event like this:
1 | IntentFilter filter = new IntentFilter(Intent.ACTION_BOOT_COMPLETED); |
Or in the AndroidManifest.xml:
1 | <receiver android:name=".MyBroadcastReceiver"> |
In this example, the MyBroadcastReceiver is set up to listen for the system’s boot completion broadcast. When the system sends an intent with the action ACTION_BOOT_COMPLETED, MyBroadcastReceiver will receive it because of the matching intent filter.
Registration
BroadcastReceivers can be registered in two ways:
- Static Registration: This is done in the AndroidManifest.xml file. The system knows about the receiver from the app’s installation time, and the receiver can be called to respond to events even if the app is not currently running.
- Dynamic Registration: This happens at runtime within the app’s code. The app must be running to register the receiver, often done in an activity or service. When the app is not running or is killed, the receiver does not receive broadcasts.
When using broadcast receivers, especially for listening to system-wide broadcasts, it is important to consider the performance implications and the best practices for registering and using receivers, as unnecessary use of broadcasts can negatively impact the performance of the application and the overall device.
The onReceive() method of a BroadcastReceiver is where you handle the logic that should be executed when the broadcast intent is received. The actions taken can vary greatly depending on the intent’s action and the app’s functionality.
Let’s say we have an application that needs to schedule some data synchronization after the device finishes booting. The logic inside onReceive() for handling Intent.ACTION_BOOT_COMPLETED could look something like this:
1 | public class BootCompletedReceiver extends BroadcastReceiver { |
In the provided code snippet:
- When the
ACTION_BOOT_COMPLETEDevent is received,scheduleDataSync()is called to schedule a data synchronization task. This could be done using Android’sJobScheduler,AlarmManager, orWorkManagerAPIs. - A notification is sent to the user indicating that the device has booted and data synchronization will start soon. This is handled by
sendBootNotification()method.
Remember, the onReceive() method runs on the main thread of your application, and you should not perform long-running operations there. If you need to do substantial work, start a service or use WorkManager to offload that work to a background thread. Also, onReceive() has a time limit of about 10 seconds; exceeding this limit can result in the app being killed by the system.